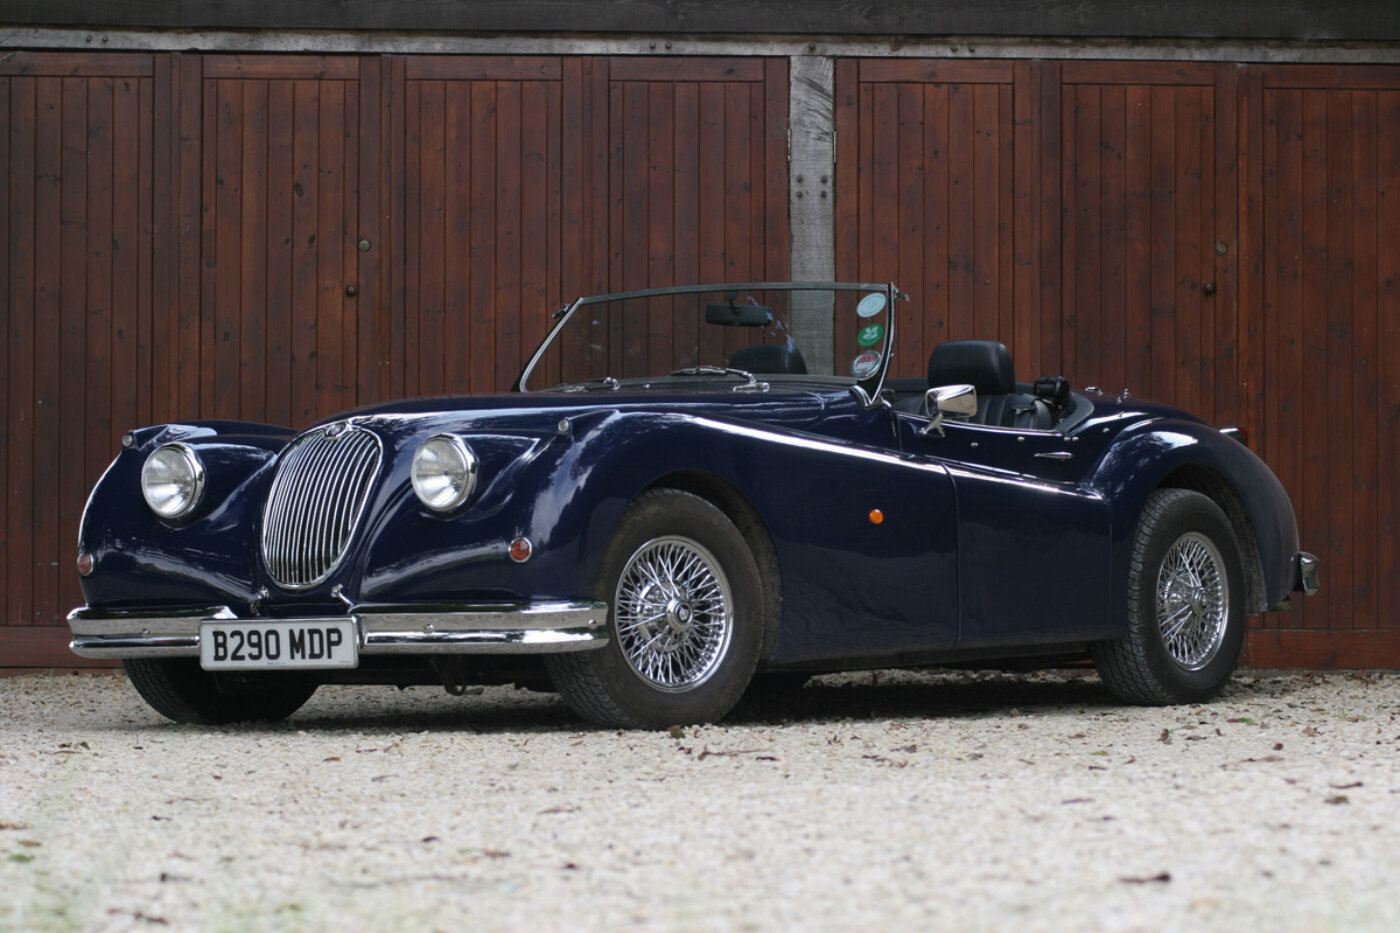
Autotune Aristocat Jaguar Reproduction
Text and Photos by Rob Hawkins and Martin Webb
Editor’s Note: One of the more laughable claims we’ve occasionally heard about project cars is that they can be completed in a just a couple weekends with a just a few simple hand tools. Get real. Most take months, some even years. Not that there’s anything wrong with that. Just don’t expect them to fly together like one of those fast-forward film sequences. Here’s one man’s experiences building a Jaguar replica, the Autotune Aristocrat, over a five-year period. We give this plucky Brit plenty of props for keeping a stiff upper lip all the while, demonstrating how persistence pays off in the long run. Even when it’s a really long run!
Martin Webb was a project car virgin prior to building his Autotune Aristocat. After he decided to build one back in 2003, he promptly started to look for a suitable donor vehicle. After joining the Jaguar Enthusiasts Club, he spotted an advert in the classifieds requesting a new home for a 1985 4.2-liter Series III XJ6. (Note that an XJ40 would work as well.) The price tag was absolutely free and the location was only 20 miles from his home!
“It was an MoT [Ministry of Transport] failure through body rust,” Martin recalls. “But it had a sound engine that started first time after standing for five months and had gorgeous leather seats with just the right amount of patina.” And the story gets event better.
While the car had 92,000 miles on the odometer, when he opened up the glove box, “I found a full service history up to 87,000 miles with the service log stamped up and signed and a sheath of MoT certificates,” he relates. “The only downside was that it had an automatic transmission. I agonized over this for a short while but came to the conclusion that as I didn’t intend to take the vehicle on track days, the hassle of modifying to an unknown manual transmission was not worth it.”
Martin confesses he took the car for a drive after he’d trailered it home, and encountered a few more surprise, some good, some not.
“I was amazed how quiet the car was, even for a 20-year-old MOT failure. However, when I got back from the run, smoke was billowing out from underneath the back axle. Mild panic ensued while I got out the garden hose and shoved it underneath the car. In the end the offending part was a handbrake pad seized onto one of the inboard discs.”
Martin quickly got stuck into tearing apart his XJ6, labeling everything as he went along. The front and rear axles were stripped and rust treated, before being coated in Hammerite and the inner cavities protected with Waxoyl. All the brakes, bearings, suspension components and even the rear radius arms were renewed.


Martin had more confidence in the XJ6’s engine thanks to the service history. However, once the 4.2-liter straight six had been removed, he laid it on its side, removed the sump and renewed the lower bearing shells (Autotune always recommends that this be done).
A year passed as Martin continued to remove and renovate the donor components. The first major point in the start of the Aristocat build was fitting the chassis panels. He found that they were oversized to allow for trimming and had to be pop riveted to the chassis.
The complete front and rear subframes from the XK6 are bolted to the Aristocat’s chassis, along with all the aforementioned suspension and brake components. “Fitting the renovated front and rear axles was very straightforward,” Martin notes.
Next, the engine and gearbox were installed together. Despite a tight space to lower these large, heavy components into, Martin managed to line everything up and mounted the engine on its original mounts, requiring only a couple of spacer plates to tilt it over a bit. The gearbox was installed with an engine mount at the rear.
The engine’s coolant and oil cooling system took a little time to work out. Martin opted to buy a substantial four-core radiator from Autotune, but used the oil coolers for the engine and gearbox from the XJ6. This latter choice proved to be a challenge. “This was a very tight squeeze and it took me several weekends to work out the coolant hose routing for these components,” he admits.
Martin used copper brake lines on his Aristocat and retained the XJ6’s pedal box, brake master cylinder and servo. “The front and rear brake pipe runs use different size fittings, probably to avoid getting them mixed up at the master cylinder,” he points out.
The Aristocat’s handbrake is situated on the right side of the driver, so it has to be the fly-off type, as fitted to the XJS (these also have a chrome finish as opposed to painted on the XJ6). Martin found an XJS handbrake lever in the classifieds of the Jaguar Enthusiasts Club magazine and the cables at a Jaguar Spares Day at Stoneleigh (held every March and October).
When Martin came to fitting the steering column, he opted to have the steering link lengthened by Autotune, which fits onto the column.
“It was installed very easily, but I found that the column passed very close to the oil filter on the engine, so to make sure there was enough clearance, I changed the oil filter to the shortest one I could find. Oil filters by Mahle, Mann or Hummel are 5 to 10mm shorter than the Jaguar original. This makes all the difference.”
One of the biggest headaches of any buildup has got to be the wiring. The Aristocat can use the XJ6’s wiring loom and Martin chose this option.


“I found this part of the build relatively straightforward so long as everything was carefully labelled as it was dismantled, and everything re-installed in the Aristocat,” he advises. “I even went to the trouble of laying out the looms in roughly the position they came out of the car and taking digital photos of the assemblies and the ends of the looms. I probably went over the top in that there are a number of looms and connectors installed in the Aristocat that will never be used. I made sure these were wrapped in self-amalgamating tape and secured somewhere safe.”
Eventually, in 2005, Martin’s Aristocat platform was ready to be driven. The chassis was fully rolling and drivable, but minus any bodywork.
“After going through numerous checks the day finally came when I could no longer delay starting the car,” he recalls. “Having previously bled all the fuel lines and checked all other fluid levels, I connected the battery. Initially I pulled the power lead from the fuel pump and removed the spark plugs. This allowed me to turn the engine over until I saw the oil pressure gauge moving. I then replaced the spark plugs and the fuel pump lead and with some apprehension, turned the key. It started first time!” But more fine tuning was in order.
“After coming down off the ceiling, I checked all gauges and checked the car for leaks then turned it off,” he recalls. “I had only run the engine for less than a minute but it seemed like an hour! The only thing wrong was that the engine was running fast—easily fixed by adjusting the throttle cable link to the throttle lever in the engine bay.”
Martin admits it took another 24 hours before he had the courage to run the engine up to temperature. “I then took the car, or should I say chassis, for a run up and down the garden. Great fun!”
Moving onto the Aristocat’s bodywork, it consists of several gelcoat-finished fiberglass panels: a front section with hood fitted, a rear body tub with the trunk lid fitted, and doors. These non-stressed parts are bolted to the chassis.


“After the first fit, I thought the body parts and doors were a long way from fitting, but it is amazing how flexible the fiberglass body is,” says Martin who started fitting the panels in 2005. “The whole process took several weekends of fitting and fettling, but it is worth getting it right.”
Some components were taken from the XJ6 for the body panels, such as the rear door-release mechanisms, which are used in the Aristocat doors. Martin chose to fit Series II door handles as they looked more in keeping with the Aristocat compared to the series III handles.
Martin also started fitting the chrome work. The Aristocat was finally looking somewhere near finished. Inside, he cut down the XJ6’s dashboard to make it fit, used the windscreen wiper motor, but gave up using the complicated heater system (not recommended for fitting).
“I spent about three weekends trying to make up an electric fan heater and matrix combination from the huge amount of parts that came out of the donor vehicle,” he comments. “In the end it just would not fit, so I gave up and went to a scrapyard and bought a Mini heater for less than $40.”
Martin decided to modify his windscreen after speaking with Autotune. He wanted a slight curve to the top rail to give it a more authentic appearance. After ordering a standard windscreen frame and a spare top rail from Autotune, he started modifying it.
“I made up a windscreen pattern using 5mm MDF board which fitted into the windscreen frame,” he explains. “I looked around the garage for something that I could use as a pattern to get a nice lazy curve to the top of the screen. I found that the chrome trim from the top of the XJ6 windscreen was a very good shape so I used that to mark out the top of the screen onto the MDF board. Using a jigsaw I cut the curve into the MDF board. The cut-off piece was then used as a pattern to bend the aluminum top rail. With a little bit of fettling I managed to get a very nice curve on the top rail.”
Armed with his template, Martin needed some glass cut to shape. He found that the firm RAC Auto Windscreens has a specialist who will come to your house and cut glass to shape and fit it into the frame. “They charge by the square meter regardless of complexity, so I was very pleased to get a windscreen cut to size with many complex curves and fully fitted for about $120. Not bad considering the fitter took about two hours to fit it!”
Sadly, the IVA now means specialist glass for the Aristocat is required, which Autotune can supply (current regulations require individual vehicles to have their own identifiable glass which Autotune supplies for Aristocat frames).
The finishing touches to the Aristocat involved a few modifications. The carpet-lined interior first involved fitting foam-filled board (available from builders’ merchants) to fill in gaps and achieve a smooth surface, before hardboard and carpet were fitted. Similarly, the trunk was lined with hardboard before finishing it off with carpet. The inside of the doors were covered in vinyl from the donor vehicle. Even the center console was taken from the XJ6 and fitted into the Aristocat.


Martin finished his Aristocat build in 2008, when the SVA (Single Vehicle Approval) was still applicable. (It’s now called the IVA, for Individual Vehicle Assessment.) An MoT was the first test, which allowed him to check headlight aim, brakes, tracking (it was toeing in by 20mm) and emissions. Next, it was the SVA.
“The test went remarkably smoothly,” says Martin. “Although the inspector was quite thorough, he certainly wasn’t a pedantic jobs-worth.” Procedures included active tests for brake efficiency and speedometer, along with noise level, mirror visibility and a check of the self-centering of the steering. The Aristocat passed all with flying colors, but upon eturning home, Martin had a few more weeks to wait before he could drive his Aristocat on the road.
“It took another two weeks to get a DVLA inspector to come round to check the chassis number and engine number and another three weeks after this to get the registration.”
So the Aristocat was finally on the road in March 2009, five-plus years since Martin had picked up a rotting Jaguar XJ6. Following an Easter break spent fitting the hood and side screens, Martin’s first major trip in his Aristocat was to the Stoneleigh Kit Car Show in May 2009.
“The car was loaded with tools, spare oil, and coolant and also sandwiches and a flask,” says Martin. “To be honest, although the journey to Stoneleigh was uneventful, I didn’t enjoy it much as I was constantly looking at the various gauges in front of me.”
The return journey home was less stressful as Martin was more confident the car was running satisfactorily. He just needed to get used to driving it.
“Sweeping bends are something to look forward to,” he says. Mesmirized by the experience, “It is difficult to keep your eyes on the road and not to look at the end of the hood as you turn the steering wheel into a bend and watch the curve of the hood glide across the road ahead. What I have found most surprising and pleasing about the Aristocat is how easy it is to drive.”
Other trips have included a tour of Devon and Cornwall and various excursions into Wales and Wiltshire. The Aristocat is a perfect tourer, with a large trunk capable of swallowing a spare wheel, tools, top frame, side screens and luggage.
Martin’s Aristocat has not been without its teething troubles. A summer downpour allowed him to discover he needed better door seals. The tracking needed adjusting after he noticed excessive wear on the inside of one of the front tires. Otherwise, Martin’s Aristocat has been impeccably reliable.
Keeping an account of all the costs involved in the build, Martin has calculated his Aristocat has totalled just over $16,400. Of course, the time spent building the car cannot be accounted for, and the donor car was free. Aristocat’s ultimate value, however, is reflected in far more than just the bottom line. After all, you can’t put a price tag on the feeling of pride in having successfully completed such an extensive project.


Comments for: NINE LIVES
comments powered by Disqus